R语言的对象系统(S3-R6)

本文转载自互联网,介绍了R语言从S3到R6的对象系统特性和使用方法。

原文链接:

另外参考:


R 面向对象编程(一) - 名本无名的文章 - 知乎 https://zhuanlan.zhihu.com/p/358532080

前言

1. 面向对象

面向对象编程(object-oriented programmingOOP)是一种编程范式,它将对象作为程序的基本单元,一个对象包含了数据以及操作数据的函数。

那什么是对象?对象是类(class)类的实例。

那什么又是类呢?

类是对现实事物的抽象,比如说,人类是对世界上所有人的总称,而你、我却是实实在在存在于现实中的,也就是一个个对象。

类的定义包含了对数据的描述以及对应的操作方法,比如,人应该有性别、年龄、身高、体重等固有特征,但是每个对象,也就是说虽然每个人的特征千差万别,但都有这些固定的属性客观存在的。

2. R 的面向对象编程

之前,我们对 R 的理解可能都是停留在函数式编程的概念里。也就是编写一个个函数,来处理不同的对象。

当然,目前 R 主要用于统计计算,而且代码量一般不会很大,几十或上百行。使用函数式的编程方式就可以很好的完成编程任务。

一般来说,在 R 中,函数式编程要比面向对象编程重要得多,因为你通常是将复杂的问题分解成简单的函数,而不是简单的对象。

那为什么我还要学习面向对象编程呢?

面向对象编程的优势是,能够使程序便于分析、设计、理解,提高重用性、灵活性和可扩展性。

R 中的 OOP 系统

  • base R 提供的:S3, S4reference classes (RC)
  • CRAN 包提供的:R6R.ooproto

S3

1.1 概念

S3 面向对象编程,是 R 中第一个也是最简单的 OOP 系统,广泛存在于早期开发的 R 包中,也是 CRAN 包最常用的系统。

S3 的实现是基于一种特殊的函数(泛型函数,根据传入对象的类型来决定调用哪个方法)

1.2 创建 S3 对象

_注意_:下面我们会使用 sloop 包提供的函数来帮助我们查看对象的类型

1
2
> install.packages('sloop')
> library(sloop)

首先,我们使用 attr 来创建一个 S3 对象

1
2
3
4
5
6
> a <- 1
> attr(a, 'class') <- 'bar'
> a
[1] 1
attr(,"class")
[1] "bar"

使用 classattr 获取对象的类型

1
2
3
4
> class(a)
[1] "bar"
> attr(a, 'class')
[1] "bar"

再用 sloop 包的 otype 来判断是何种对象

1
2
3
4
> otype(a)
[1] "S3"
> otype(1)
[1] "base"

我们也可以使用 structure 来构建一个 S3 对象

1
2
3
4
5
6
7
> b <- structure(2, class='foo')
> b
[1] 2
attr(,"class")
[1] "foo"
> otype(b)
[1] "S3"

还可以使用为 class(var) 赋值的方式构建

1
2
3
4
5
6
7
8
9
10
11
> x <- list(a=1)
> class(x)
[1] "list"
> otype(x)
[1] "base"

> class(x) <- 'foo'
> class(x)
[1] "foo"
> otype(x)
[1] "S3"

还可以将类属性设置为向量,为 S3 对象指定多个类型

1
2
3
4
5
> c <- structure(3, class=c('bar', 'foo'))
> class(c)
[1] "bar" "foo"
> otype(c)
[1] "S3"

1.3 创建泛型函数

通常,我们使用 UseMethod() 来创建一个泛型函数,例如

1
2
3
person <- function(x, ...) {
UseMethod('person')
}

定义完泛型函数之后,可以使用以下方式

  • person.xxx 定义名为 xxx 的方法
  • person.default 定义默认方法
1
2
3
4
5
6
7
8
9
10
11
person.default <- function(x, ...) {
print("I am human.")
}

person.sing <- function(x, ...) {
print("I can sing")
}

person.name <- function(x, ...) {
print(paste0("My name is ", x))
}

那如何调用这些方法呢?

首先,我们定义一个 class 属性为 "sing" 的变量

1
> a <- structure("tom", class='sing')

然后,将该对象 a 传入 person

1
2
3
4
> person(tom)
[1] "I can sing"
> person.sing(a)
[1] "I can sing"

可以看到,调用了 person.sing() 方法。

让我们再尝试其他类型

1
2
3
4
5
> b <- structure("tom", class='name')
> person(b)
[1] "My name is tom"
> person("joy")
[1] "I am human."

这样,我们只要使用 person 函数,就能够对不同类型的输入做出相应,输入不同类型的对象会自动调用相应的方法。

对于未指定的类型,会调用 person.default 方法。这就是泛型函数。

1.4 S3 对象的方法

我们可以使用 methods() 函数来获取 S3 对象包含的所有方法

1
2
> methods(person)
[1] person.default person.name person.sing

可以使用 generic.function 参数,传递想要查询的泛型函数

1
2
3
4
> library(magrittr)
> methods(generic.function = print) %>% head()
[1] "print.acf" "print.anova" "print.aov" "print.aovlist"
[5] "print.ar" "print.Arima"

class 参数指定类名

1
2
3
4
> methods(class = lm) %>% head()
[1] "add1.lm" "alias.lm"
[3] "anova.lm" "case.names.lm"
[5] "coerce,oldClass,S3-method" "confint.lm"

_注意_:一些输出的函数名后缀有 * 号表示不可见函数,例如

1
2
> print.xtabs
错误: 找不到对象'print.xtabs'

可以使用 getAnywhere 获取

1
2
3
4
5
6
7
8
9
10
11
12
13
14
15
16
17
> getAnywhere(print.xtabs)
A single object matching ‘print.xtabs’ was found
It was found in the following places
registered S3 method for print from namespace stats
namespace:stats
with value


function (x, na.print = "", ...)
{
ox <- x
attr(x, "call") <- NULL
print.table(x, na.print = na.print, ...)
invisible(ox)
}
<bytecode: 0x7fe1e612b9e8>
<environment: namespace:stats>

或者 getS3method

1
2
3
4
5
6
7
8
9
10
> getS3method("print", "xtabs")
function (x, na.print = "", ...)
{
ox <- x
attr(x, "call") <- NULL
print.table(x, na.print = na.print, ...)
invisible(ox)
}
<bytecode: 0x7fe1e612b9e8>
<environment: namespace:stats>

1.5 S3 对象的继承

S3 对象是通过 NextMethod() 方法继承的,让我们先定义一个泛型函数

1
2
3
4
5
6
7
8
9
10
11
12
person <- function(x, ...) {
UseMethod('person')
}

person.father <- function(x, ...) {
print("I am father.")
}

person.son <- function(x, ...) {
NextMethod()
print("I am son.")
}

执行

1
2
3
4
5
6
7
> p1 <- structure(1,class=c("father"))
> person(p1)
[1] "I am father."
> p2 <- structure(1,class=c("son","father"))
> person(p2)
[1] "I am father."
[1] "I am son."

可以看到,在调用 person(p2) 之后,会先执行 person.father() 然后执行 person.son()

_注意_:需要将被继承的类型放在第二个(son 之后)

1
2
3
> ab <- structure(1, class = c("father", "son"))
> person(ab)
[1] "I am father."

这样就实现了面向对象编程中的继承

1.6 缺点

  1. S3 并不是完全的面向对象,而是基于泛型函数模拟的面向对象
  2. S3 用起来简单,但是对于复杂的对象关系,很难高清对象的意义
  3. 缺少检查,class 属性可以被任意设置

1.7 示例

S3 对象系统广泛存在于 R 语言的早期开发中,因此,在 base 包中包含了许多 S3 对象。

例如

1
2
3
4
> ftype(plot)
[1] "S3" "generic"
> ftype(print)
[1] "S3" "generic"

自定义 S3 对象

1
2
3
4
5
6
7
8
9
10
11
say <- function(x, ...) {
UseMethod("say")
}

say.numeric <- function(x, ...) {
paste0("the number is ", x)
}

say.character <- function(x, ...) {
paste0("the character is ", x)
}

使用

1
2
3
4
> say('nam')
[1] "the character is nam"
> say(12315)
[1] "the number is 12315"
  • END -

R 面向对象编程(二) - 名本无名的文章 - 知乎 https://zhuanlan.zhihu.com/p/358783073

S4

2.1 介绍

S4 是标准的 R 语言面向对象实现方式,比 S3 的定义更加严格,S4 对象有专门的函数用于定义类(setClass)、泛型函数(setGeneric)、方法(setMethod)以及实例化对象(new),提供了参数检查,多重继承功能。

S4 有一个重要的组件 slot,它是对象的属性组件,可以使用专门的运算符 @(发音为 at)来访问。

Bioconductor 社区是以 S4 对象作为基础框架,只接受 S4 定义的 R 包。所以,学习 S4 是非常有必要的

2.2 创建对象

我们需要使用 setClass 来定义一个类,setClass 的参数为

1
2
3
setClass(Class, representation, prototype, contains=character(),
validity, access, where, version, sealed, package,
S3methods = FALSE, slots)
  • Class: 指定类名
  • slots: 定义属性和属性类型,list 或命名向量
  • prototype: 设置属性的默认值
  • contains=character(): 指定父类(继承)
  • validity: 定义属性的类型检查器
  • where: 设置存储空间
  • sealed: 如果为 TRUE,则不能使用 setClass 定义相同的类名
  • package: 定义所属的包

version, package, representation, S3methods 这四个参数在 R-3.0.0 之后不推荐使用

首先,定义一个对象

1
setClass("Person",slots=list(name="character",age="numeric"))

然后,初始化一个实例

1
2
3
4
5
6
7
8
> tom <- new("Person",name="tom",age=18)
> tom
An object of class "Person"
Slot "name":
[1] "tom"

Slot "age":
[1] 18

也可以使用另一种方式

1
2
3
4
5
6
7
8
9
10
> Person <- setClass("Person",slots=list(name="character",age="numeric"))
> tom <- Person(name="tom", age=18)
> tom
An object of class "Person"
Slot "name":
[1] "tom"

Slot "age":
[1] 18

我们可以初始化的对象实例包含两个属性(slotnameage

1
2
3
4
5
6
> class(tom)
[1] "Person"
attr(,"package")
[1] ".GlobalEnv"
> otype(tom)
[1] "S4"

tom 是一个 S4 对象,类型为 Person

那如何访问属性值呢?

我们可以使用 slotNames 获取对象的属性,接受一个 S4 对象变量或字符串类名

1
2
3
4
> slotNames(tom)
[1] "name" "age"
> slotNames("Person")
[1] "name" "age"

getSlotsslotNames 类似,传入字符串类名,返回属性及其类型的字符串向量

1
2
3
4
> getSlots("Person")
name age
"character" "numeric"

获取属性值

1
2
3
4
5
6
7
8
> tom@name
[1] "tom"
> tom@age
[1] 18
> slot(tom, "name")
[1] "tom"
> slot(tom, "age")
[1] 18

不同于 S3 使用 $ 来访问对象的属性,在 S4 中使用 @ 来获取对象的属性,或者使用 slot 函数

当然,我们也可以更改属性的值

1
2
3
4
5
6
7
8
9
10
11
12
13
14
15
16
17
> tom@age <- 28
> tom
An object of class "Person"
Slot "name":
[1] "tom"

Slot "age":
[1] 28

> slot(tom, "age") <- 21
> tom
An object of class "Person"
Slot "name":
[1] "tom"

Slot "age":
[1] 21

getClass 也接受一个 S4 对象变量,返回包含属性及其对应的值的 list;或字符串类名,返回属性名称及对应的类型

1
2
3
4
5
6
7
8
9
10
11
12
13
14
15
> getClass(tom)
An object of class "Person"
Slot "name":
[1] "tom"

Slot "age":
[1] 18

> getClass("Person")
Class "Person" [in ".GlobalEnv"]

Slots:

Name: name age
Class: character numeric

2.3 设置默认值

当我们不设置属性值时,其默认值为空(不同类型的空值),比如

1
2
3
4
5
6
7
8
> tom <- new("Person")
> tom
An object of class "Person"
Slot "name":
character(0)

Slot "age":
numeric(0)

那如何设置属性的默认值呢?

我们可以在 setClass 中指定 prototype 参数,让我们重新定义我们的 Person

1
2
setClass("Person",slots=list(name="character",age="numeric"),
prototype = list(name='Unknow', age=18))

我们在初始化实例时,不指定属性值会返回默认的值,如

1
2
3
4
5
6
7
8
9
10
11
12
13
14
15
16
> new("Person")
An object of class "Person"
Slot "name":
[1] "Unknow"

Slot "age":
[1] 18

> sam <- new("Person",name="sam")
> sam
An object of class "Person"
Slot "name":
[1] "sam"

Slot "age":
[1] 18

2.4 类型检查

在上面 Person 类的定义中,我们指定了属性值的类型,如果我们传入的类型不一致会是什么结果呢?

1
2
3
> new("Person", name="tom", age="0")
Error in validObject(.Object) :
类别为“Person”的对象不对: invalid object for slot "age" in class "Person": got class "character", should be or extend class "numeric"

会抛出异常。

但是对于 age 参数应该是非负值,这种非类型错误可以进行额外的检查

1
2
3
4
5
6
7
8
setClass("Person",
slots=list(name="character",age="numeric"),
prototype = list(name='Unknow', age=18),
validity = function(object) {
if(object@age <= 0)
return("Age is negative.")
return(TRUE)
})

测试

1
2
3
> new("Person", name="tom", age=-1)
Error in validObject(.Object) :
类别为“Person”的对象不对: Age is negative.

或者在 setClass 外部使用 setValidity 设置检查

1
2
3
4
5
6
7
8
setClass("Person",slots=list(name="character",age="numeric"),
prototype = list(name='Unknow', age=18))

setValidity("Person", function(object) {
if(object@age <= 0)
return("Age is negative.")
return(TRUE)
})

2.5 使用已有实例创建新实例

S4 对象还支持使用已经实例化的对象来创建新的实例化对象

1
2
3
4
5
6
7
8
9
10
11
12
13
14
15
16
17
18
> setClass("Person",slots=list(name="character",age="numeric"))
> tom <- new("Person",name="tom",age=18)
> jay <- initialize(tom, name="jay", age=20)
> jay
An object of class "Person"
Slot "name":
[1] "jay"

Slot "age":
[1] 20

> tom
An object of class "Person"
Slot "name":
[1] "tom"

Slot "age":
[1] 18

2.6 创建函数

在定义了类及其属性之后,我们就可以定义与类相关联的方法了

S4 的函数定义不同于 S3S4 将函数的定义和实现分开了,即接口和实现分离。

先通过 setGeneric() 来定义函数的接口,然后通过 setMethod() 来实现函数功能。

我们先定义一个函数接口

1
setGeneric(name = "getName",def = function(object) standardGeneric("getName"))

然后,实现函数的功能并指定类型

1
2
setMethod(f = "getName",signature = "Person",
definition = function(object) object@name)

示例

我们定义一个 Person 类,包含了 nameage 两个属性,然后分别为这两个属性定义 getset 方法。

通常,我们在面向对象的程序设计中,会将数据进行封装,而不是直接把数据暴露出来。如

1
2
3
4
5
6
7
8
9
10
11
12
13
14
15
16
17
18
19
20
21
22
23
24
setClass("Person",slots=list(name="character",age="numeric"),
prototype = list(name='Unknow', age=18))

setGeneric(name = "getName",def = function(object) standardGeneric("getName"))
setMethod(f = "getName",signature = "Person",
definition = function(object) object@name)

setGeneric(name = "setName",def = function(object, name) standardGeneric("setName"))
setMethod(f = "setName",signature = "Person",
definition = function(object, name) {
object@name <- name
return(object)
})

setGeneric(name = "getAge",def = function(object) standardGeneric("getAge"))
setMethod(f = "getAge",signature = "Person",
definition = function(object) object@age)

setGeneric(name = "setAge",def = function(object, age) standardGeneric("setAge"))
setMethod(f = "setAge",signature = "Person",
definition = function(object, age) {
object@age <- age
return(object)
})

使用方法

1
2
3
4
5
6
7
8
9
10
11
12
13
14
15
16
17
18
19
20
> tom <- new("Person",name="tom",age=18)
> getName(tom)
[1] "tom"
> getAge(tom)
[1] 18
> setName(tom, "tomi")
An object of class "Person"
Slot "name":
[1] "tomi"

Slot "age":
[1] 18

> setAge(tom, 22)
An object of class "Person"
Slot "name":
[1] "tom"

Slot "age":
[1] 22

查看函数的类型

1
2
> ftype(getName)
[1] "S4" "generic"

查看函数的信息

1
2
3
4
5
6
7
8
9
10
11
12
13
14
15
> getMethod("getAge", "Person")
Method Definition:

function (object)
object@age

Signatures:
object
target "Person"
defined "Person"

> existsMethod("getAge", "Person")
[1] TRUE
> hasMethod("getAge", "Person")
[1] TRUE

2.7 继承

S4 对象的继承是通过 contains 参数来设置的,可接受字符串类名或字符串向量

例如,我们定义 chinese 类并继承自 Person

1
2
3
4
5
6
7
8
9
Person <- setClass("Person",
slots=list(name="character",age="numeric"),
prototype = list(name='Unknow', age=18),
validity = function(object) {
if(object@age <= 0)
return("Age is negative.")
return(TRUE)
})
chinese <- setClass("chinese", contains = "Person")

创建实例

1
2
3
4
5
6
7
> chinese(name="lisin", age = 38)
An object of class "chinese"
Slot "name":
[1] "lisin"

Slot "age":
[1] 38

2.8 实例

我们举个例子来加深对 S4 实现面向对象编程的理解

  1. 我们先定义一个顶层的类:Shape
  2. 然后定义两个继承自 Shape 的子类:CircleRectangle
  3. 并添加对应的计算面积和周长的函数:areacircum

我们定义如下

1
2
3
4
5
6
7
8
9
10
11
12
13
14
15
16
17
18
19
20
21
22
23
24
25
26
27
28
29
30
31
32
33
34
35
36
37
38
39
40
41
42
43
44
45
46
# 设置父类
Shape <- setClass("Shape", slots = c(shape="character"))
# 定义父类方法,获取 shape 属性的值
setGeneric("getShape",function(object, ...){
standardGeneric("getShape")
})

setMethod("getShape", "Shape", function(object, ...) {
return(object@shape)
})
# 定义 area 函数的接口
setGeneric("area",function(object, ...){
standardGeneric("area")
})
# 定义 circum 函数的接口
setGeneric("circum",function(object, ...){
standardGeneric("circum")
})
# 定义 Circle 类
Circle <- setClass("Circle", slots = c(radius="numeric"),
contains = "Shape", prototype = list(radius=1, shape="circle"),
validity = function(object) {
if(object@radius <= 0) stop("Radius is negative")
})
# area 函数对 Circle 类的实现
setMethod("area", "Circle", function(object, ...){
return(pi * object@radius^2)
})
# circum 函数对 Circle 类的实现
setMethod("circum", "Circle", function(object, ...){
return(2 * pi * object@radius)
})
# 定义 Rectangle 类
Rectangle <- setClass("Rectangle", slots = c(height="numeric", width="numeric"),
contains = "Shape", prototype = list(height=1, width=1, shape="rectangle"),
validity = function(object) {
if(object@height <= 0 | object@width <= 0) stop("Radius is negative")
})
# area 函数对 Rectangle 类的实现
setMethod("area", "Rectangle", function(object, ...){
return(object@height * object@width)
})
# circum 函数对 Rectangle 类的实现
setMethod("circum", "Rectangle", function(object, ...){
return(2 * (object@height + object@width))
})

使用

1
2
3
4
5
6
7
8
9
10
11
> a <- Circle(radius = 3)
> area(a)
[1] 28.27433
> circum(a)
[1] 18.84956
>
> b <- Rectangle(height = 3, width = 4)
> area(b)
[1] 12
> circum(b)
[1] 14

使用 getShape 获取 shape 属性

1
2
3
4
> getShape(a)
[1] "circle"
> getShape(b)
[1] "rectangle"

R 面向对象编程(三)—— RC - 名本无名的文章 - 知乎 https://zhuanlan.zhihu.com/p/359074012

RC

3.1 介绍

Reference Classes(RC) 是在 R 2.12 版本开始引入的新一代的面向对象系统,也被称为 R5(这并不是官方的名称,只是为了和 S3S4 保持队形( ̄。。 ̄))。

这个面向对象系统不同于 S3S4 使用泛型函数模型实现类和方法,RC 的方法被 封装 在类的定义中。

RC 面向对象系统在行为、风格上更像其他面向对象编程语言,如 JavaC++ 等。

RC 使用 $ 符号来调用方法,获取和修改对象的属性,调用方法或设置属性的值会修改对象,这种方式不同于常用的函数式编程模型。

3.2 创建 RC 类

首先,我们可以使用 setRefClass 来定义类,并返回一个生成器对象。

1
2
setRefClass(Class, fields = , contains = , methods =,
where =, inheritPackage =, ...)

参数列表:

  • Class: 字符串类名
  • fields: 定义属性名称与类型,可以是命名字符串向量或命名列表。
  • contains: 定义父类,多重继承传递父类向量。如果父类也是 RC,会继承父类的属性和方法
  • methods: 一个命名列表,定义对象可调用的方法。也可以使用 $methods 方法定义函数
  • where: 类定义的存储空间
  • inheritPackage: 是否继承父类的环境
  • ...: 其他参数类似 setClass

定义一个 RC 类

1
2
3
4
5
6
7
8
9
10
11
12
13
14
15
16
> Person <- setRefClass("Person", fields = c(name='character',age='numeric',gender='factor'))
> Person
Generator for class "Person":

Class fields:

Name: name age gender
Class: character numeric factor

Class Methods:
"sing", "say", "field", "trace", "getRefClass", "initFields", "copy", "callSuper",
".objectPackage", "export", "untrace", "getClass", "show", "usingMethods", ".objectParent",
"import"

Reference Superclasses:
"envRefClass"

使用 $new 实例化对象,也可以直接使用类名实例化

1
2
3
4
5
6
7
8
9
10
11
12
> genders <- factor(c("F", "M"))
> tom <- Person$new(name="tom", age=19, gender=genders[1])
# tom <- Person(name="tom", age=19, gender=genders[1])
> tom
Reference class object of class "Person"
Field "name":
[1] "tom"
Field "age":
[1] 19
Field "gender":
[1] F
Levels: F M

查看类型

1
2
3
4
5
6
> otype(tom)
[1] "RC"
> class(tom)
[1] "Person"
attr(,"package")
[1] ".GlobalEnv"

3.3 访问属性

我们可以使用 $ 符号,访问及修改属性值

1
2
3
4
5
6
7
> tom$name
[1] "tom"
> tom$age
[1] 19
> tom$age <- tom$age + 1
> tom$age
[1] 20

赋值给另一个对象

1
2
3
4
5
6
7
8
9
10
11
12
13
14
15
16
17
18
19
20
21
22
23
24
25
26
27
28
29
> sam <- tom
> sam
Reference class object of class "Person"
Field "name":
[1] "tom"
Field "age":
[1] 20
Field "gender":
[1] F
Levels: F M
> sam$name <- "sam"
> sam
Reference class object of class "Person"
Field "name":
[1] "sam"
Field "age":
[1] 20
Field "gender":
[1] F
Levels: F M
> tom
Reference class object of class "Person"
Field "name":
[1] "sam"
Field "age":
[1] 20
Field "gender":
[1] F
Levels: F M

以直接赋值的方式,只是传递了对象的引用,而不是重新构建了一个实例。

可以调用内置的 copy() 方式,创建一份拷贝

1
2
3
4
5
6
7
8
9
10
11
12
13
14
15
16
17
18
19
20
> sam <- tom$copy()
> sam$age <- 28
> sam
Reference class object of class "Person"
Field "name":
[1] "sam"
Field "age":
[1] 28
Field "gender":
[1] F
Levels: F M
> tom
Reference class object of class "Person"
Field "name":
[1] "sam"
Field "age":
[1] 20
Field "gender":
[1] F
Levels: F M

3.4 定义方法

RC 对象系统中,我们可以在创建类的同时指定对应的方法,而不需要将类和函数的定义分离。

例如,我们定义 Person

1
2
3
4
5
6
7
8
9
Person <- setRefClass("Person", fields = c(name='character',age='numeric',gender='factor'),
methods = list(
setName = function(x) {
name <<- x
},
setAge = function(x) {
age <<- x
}
))

然后使用方法,改变属性值

1
2
3
4
5
6
7
8
9
10
11
> jay <- Person(name="jay", age=21, gender=genders[2])
> jay$setAge(28)
> jay
Reference class object of class "Person"
Field "name":
[1] "jay"
Field "age":
[1] 28
Field "gender":
[1] M
Levels: F M

_注意_:我们在函数内部使用了 <<- 赋值方式。

该赋值方式通常在函数中使用,会在其上层环境中搜索该变量,如果找到了,则重新为该变量赋值;否则会创建为一个全局变量

如果我们将上面的代码改为

1
2
3
4
5
6
7
8
9
Person <- setRefClass("Person", fields = c(name='character',age='numeric',gender='factor'),
methods = list(
setName = function(x) {
name <- x
},
setAge = function(x) {
age <- x
}
))

执行相同的代码

1
2
3
4
5
6
7
8
9
10
11
> jay <- Person(name="jay", age=21, gender=genders[2])
> jay$setAge(28)
> jay
Reference class object of class "Person"
Field "name":
[1] "jay"
Field "age":
[1] 21
Field "gender":
[1] M
Levels: F M

发现 age 的值并没有被修改

为了不让类定义看起来很臃肿,可以将函数的定义剥离出来。

我们可以使用 $methods() 的方式为类定义相应的方法。

1
2
3
4
5
6
7
8
9
10
Person <- setRefClass("Person", fields = c(name='character',age='numeric',gender='factor'))

Person$methods(
setName = function(x) {
name <<- x
},
setAge = function(x) {
age <<- x
}
)

调用方法

1
2
3
4
5
6
7
8
9
10
11
> jay <- Person(name="jay", age=21, gender=genders[2])
> jay$setAge(28)
> jay
Reference class object of class "Person"
Field "name":
[1] "jay"
Field "age":
[1] 28
Field "gender":
[1] M
Levels: F M

3.5 定义构造函数

RC 类在实例化对象时,会自动调用构造器函数 $initialize(),我们可以使用该函数来初始化属性值

1
2
3
4
5
6
7
8
Person <- setRefClass("Person", fields = c(name='character',age='numeric',gender='factor'),
methods = list(
initialize = function(name="Unknown", age=18, gender=genders[1]) {
name <<- name
age <<- age
gender <<- gender
}
))

实例化

1
2
3
4
5
6
7
8
9
10
11
12
13
14
15
16
17
18
> Person()
Reference class object of class "Person"
Field "name":
[1] "Unknown"
Field "age":
[1] 18
Field "gender":
[1] F
Levels: F M
> Person(name="tom")
Reference class object of class "Person"
Field "name":
[1] "tom"
Field "age":
[1] 18
Field "gender":
[1] F
Levels: F M

3.6 继承

RC 也是通过 contains 参数来指定父类

1
2
3
4
5
6
7
User <- setRefClass("User", fields = c(username="character", password="character"))
User$methods(
getName = function() {
return(username)
}
)
VIP <- setRefClass("VIP", contains = "User", fields = c(level="numeric"))

使用

1
2
3
4
5
6
7
8
9
10
11
tom <- VIP(username="tom", password="123456", level=3)
> tom
Reference class object of class "VIP"
Field "username":
[1] "tom"
Field "password":
[1] "123456"
Field "level":
[1] 3
> tom$getName()
[1] "tom"
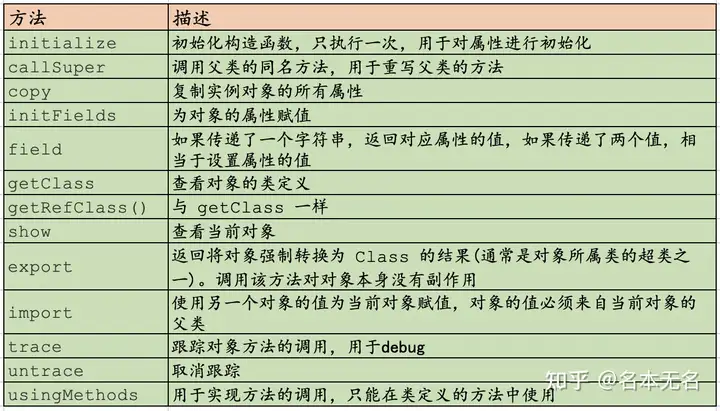
3.7 RC 的内置方法

在我们定义完类之后

1
2
3
4
5
6
7
8
9
10
11
12
13
14
15
> Person
Generator for class "Person":

Class fields:

Name: name age gender
Class: character numeric factor

Class Methods:
"initialize", "field", "trace", "getRefClass", "initFields", "copy", "callSuper",
".objectPackage", "export", "untrace", "getClass", "show", "usingMethods", ".objectParent",
"import"

Reference Superclasses:
"envRefClass"

Class Methods 输出的方法中我们可以看到,很多方法都不是我们定义的,这些都是内置的方法。像我们前面用到的 copyinitialize 也在其中

我们为上面的继承的例子,添加一些功能

1
2
3
4
5
6
7
8
9
10
11
12
13
14
15
16
17
18
19
User <- setRefClass("User", fields = c(username="character", password="character"))
User$methods(
getName = function() {
return(username)
}
)

VIP <- setRefClass("VIP", contains = "User", fields = c(level="numeric"))
VIP$methods(
getName = function() {
cat("VIP:", callSuper())
},
add = function(x, y) {
return(x+y)
},
multiple = function(x, y) {
return(x*y)
}
)

我们在子类中重写了 getName 方法,通过 callSuper() 调用父类的 getName 方法获取 name 属性,并在前面添加 VIP 标记

1
2
3
> tom <- VIP(username="tom", password="123456", level=3)
> tom$getName()
VIP: tom

我们重新为 tom 的属性赋值

1
2
3
4
5
6
7
8
9
10
11
12
13
14
15
16
> tom$initFields(username="sam", password="1234")
Reference class object of class "VIP"
Field "username":
[1] "sam"
Field "password":
[1] "1234"
Field "level":
[1] 3
> tom
Reference class object of class "VIP"
Field "username":
[1] "sam"
Field "password":
[1] "1234"
Field "level":
[1] 3

获取或设置某一属性

1
2
3
4
5
6
7
8
9
10
11
> tom$field("username")
[1] "sam"
> tom$field("username", "tom")
> tom
Reference class object of class "VIP"
Field "username":
[1] "tom"
Field "password":
[1] "1234"
Field "level":
[1] 3

获取对象的类的定义

1
2
3
4
5
6
7
8
9
10
11
12
13
14
15
16
17
18
19
20
21
22
23
24
25
26
27
28
29
30
31
32
33
34
35
36
> tom$getClass()
Reference Class "VIP":

Class fields:

Name: username password level
Class: character character numeric

Class Methods:
"getName#User", "multiple", "add", "import", ".objectParent", "usingMethods", "show", "getClass",
"untrace", "export", ".objectPackage", "callSuper", "copy", "initFields", "getRefClass", "trace",
"field", "getName"

Reference Superclasses:
"User", "envRefClass"

> tom$getRefClass()
Generator for class "VIP":

Class fields:

Name: username password level
Class: character character numeric

Class Methods:
"getName#User", "multiple", "add", "import", ".objectParent", "usingMethods", "show", "getClass",
"untrace", "export", ".objectPackage", "callSuper", "copy", "initFields", "getRefClass", "trace",
"field", "getName"

Reference Superclasses:
"User", "envRefClass"
# 查看类型
> otype(tom$getClass())
[1] "S4"
> otype(tom$getRefClass())
[1] "RC"

tom$show()show(tom) 以及直接输入 tom 都可以输出对象的信息

1
2
3
4
5
6
7
8
9
10
11
12
13
14
15
16
> tom$show()
Reference class object of class "VIP"
Field "username":
[1] "tom"
Field "password":
[1] "1234"
Field "level":
[1] 3
> show(tom)
Reference class object of class "VIP"
Field "username":
[1] "tom"
Field "password":
[1] "1234"
Field "level":
[1] 3

追踪方法

1
2
3
4
5
6
7
8
9
10
11
12
13
14
> tom$trace("add")
Tracing reference method "add" for object from class "VIP"
[1] "add"
> tom$add(1, 3)
Tracing tom$add(1, 3) on entry
[1] 4
> tom$add(4, 5)
Tracing tom$add(4, 5) on entry
[1] 9
> tom$untrace("add")
Untracing reference method "add" for object from class "VIP"
[1] "add"
> add(1, 1)
[1] 2

将子类转换为父类类型

1
2
3
4
5
6
7
8
9
10
11
12
13
14
> tom$export('User')
Reference class object of class "User"
Field "username":
[1] "tom"
Field "password":
[1] "1234"
> tom
Reference class object of class "VIP"
Field "username":
[1] "tom"
Field "password":
[1] "1234"
Field "level":
[1] 3

从上面的结果可以看到,转换为父类型之后,level 属性被删除了,但是原始对象并没有被修改

使用一个对象给另一个对象赋值

1
2
3
4
5
6
7
8
9
10
11
12
13
14
15
16
17
18
19
20
21
22
23
24
25
26
27
> sam <- VIP()
> sam
Reference class object of class "VIP"
Field "username":
character(0)
Field "password":
character(0)
Field "level":
numeric(0)
> sam$import(tom$export("User"))
> sam
Reference class object of class "VIP"
Field "username":
[1] "tom"
Field "password":
[1] "1234"
Field "level":
numeric(0)
> sam$import(tom)
> sam
Reference class object of class "VIP"
Field "username":
[1] "tom"
Field "password":
[1] "1234"
Field "level":
[1] 3

3.8 RC 类方法

我们使用 setRefClass 函数定义的类,会自动包含一些方法帮助我们查看类的属性和方法。

比如,我们上面使用到的 $new() 函数,还有一些其他函数

查看 User 类中的属性及其类型

1
2
3
> User$fields()
username password
"character" "character"

查看 User 中定义的方法

1
2
3
4
> User$methods()
[1] ".objectPackage" ".objectParent" "callSuper" "copy" "export"
[6] "field" "getClass" "getName" "getRefClass" "import"
[11] "initFields" "show" "trace" "untrace" "usingMethods"

查看函数的调用方式

1
2
3
> VIP$help("add")
Call:
$add(x, y)

User 的属性增加 getset 方法

1
2
3
4
5
6
> User$accessors("password")
> User$methods()
[1] ".objectPackage" ".objectParent" "callSuper" "copy" "export"
[6] "field" "getClass" "getName" "getPassword" "getRefClass"
[11] "import" "initFields" "setPassword" "show" "trace"
[16] "untrace" "usingMethods"

将属性固定,一旦赋值后便不可更改

1
2
3
4
5
6
7
8
9
10
11
12
13
> User$lock("username")
# 查看被锁定的属性
> User$lock()
[1] "username"
> a <- User(username="fly")
> a
Reference class object of class "User"
Field "username":
[1] "fly"
Field "password":
character(0)
> a$username <- "a"
错误: invalid replacement: reference class field ‘username’ is read-only

3.9 示例

1
2
3
4
5
6
7
8
9
10
11
12
13
14
15
16
17
18
19
20
21
22
23
24
25
26
27
28
29
30
31
32
33
34
35
36
37
38
39
40
41
42
43
44
45
46
47
48
49
50
51
52
53
54
Person <- setRefClass(
"Person",
fields = list(
name="character",
age="numeric"
),
methods = list(
initialize = function(name="Unknown", age=18) {
name <<- name
age <<- age
},
talk = function() {
return("talking...")
}
)
)

Chinese <- setRefClass(
"Chinese",
contains = "Person",
fields = list(
language="character"
),
methods = list(
initialize = function(name, age, language="chinese") {
callSuper(name, age)
language <<- language
},
talk = function() {
return(paste0(callSuper(), language))
}

)
)
Chinese$lock("language")

American <- setRefClass(
"American",
contains = "Person",
fields = list(
language="character"
),
methods = list(
initialize = function(name, age, language="english") {
callSuper(name, age)
language <<- language
},
talk = function() {
return(paste0(callSuper(), language))
}
)
)

American$lock("language")

使用

1
2
3
4
5
6
7
8
9
10
11
12
13
14
15
16
17
18
19
20
21
22
> a <- American("lusy", 20)
> a
Reference class object of class "American"
Field "name":
[1] "lusy"
Field "age":
[1] 20
Field "language":
[1] "english"
> a$talk()
[1] "talking...english"
> b <- Chinese("lisin", 18)
> b
Reference class object of class "Chinese"
Field "name":
[1] "lisin"
Field "age":
[1] 18
Field "language":
[1] "chinese"
> b$talk()
[1] "talking...chinese"
  • END -

R 面向对象编程(四)—— R6 - 名本无名的文章 - 知乎 https://zhuanlan.zhihu.com/p/359383772

R6

4.1 介绍

R6R 的封装式面向对象编程的实现,比内置的 RC 类更简单,更快,更轻量级。

与内置的 R3R4RC 不同,R6 是一个单独的 R 包,因此不需要依赖 methods 包。

R6 类支持:

  • 属性和方法的公有化和私有化
  • 主动绑定
  • 跨包之间的继承

为什么这个包叫 R6 呢?

哈哈,当然是为了保持队形了啊

S3、S4、S5、S6,虽然 RC 的官方名称并不是 S5,但不妨碍大家这么称呼。

学过其他语言的面向对象编程系统的应该知道,我们前面几节讲的 R 中几种系统设计的并不够好,所以,需要 R6 这样的包。

4.2 创建 R6 对象

R6 是第三方包,所以记得先安装一下

1
2
install.packages("R6")
library(R6)

R6 是通过 R6Class() 函数创建类

1
2
3
4
R6Class(classname = NULL, public = list(), private = NULL,
active = NULL, inherit = NULL, lock_objects = TRUE, class = TRUE,
portable = TRUE, lock_class = FALSE, cloneable = TRUE,
parent_env = parent.frame(), lock)

参数列表

创建一个简单的 Person

1
2
3
4
5
6
7
8
9
10
11
12
Person <- R6Class(
"Person",
public = list(
name = NA,
initialize = function(name) {
self$name <- name
},
say = function() {
cat("my name is ", self$name)
}
)
)

创建实例,同样使用 $new 方法来实例化

1
2
3
4
5
6
7
8
> tom <- Person$new(name = "tom")
> tom
<Person>
Public:
clone: function (deep = FALSE)
initialize: function (name)
name: tom
say: function ()

查看类与实例的类型

1
2
3
4
5
6
7
8
> class(Person)
[1] "R6ClassGenerator"
> class(tom)
[1] "Person" "R6"
> otype(tom)
[1] "S3"
> otype(Person)
[1] "S3"

我们可以看到,其实 R6 系统是基于 S3 构建的,这也是它不同于 RC 的原因

4.3 公有成员与私有成员

R6 系统的类定义中,可以设置公有成员和私有成员。这一特征与 JavaC++ 的类很像,使用私有成员来隐藏一些数据属性和方法。

R6 中公有成员的访问使用的是 self 对象来引用,而私有需要用 private 对象来引用。

在前面的例子中,我们使用的是 self$name 来获取公有属性 name,现在让我们来添加私有成员

1
2
3
4
5
6
7
8
9
10
11
12
13
14
15
16
17
18
19
20
21
22
23
24
Person <- R6Class(
"Person",
public = list(
name = NA,
initialize = function(name, money) {
self$name <- name
private$money <- money
},
say = function() {
cat("my name is ", self$name)
},
incSalary = function(percent) {
private$setMoney(private$money * (1 + percent))
invisible(self)
}
),
private = list(
money = NA,
setMoney = function(m) {
cat(paste0("change ", self$name, "'s salary!\n"))
private$money <- m
}
)
)

我们添加了私有属性 money 和私有函数 setMoney

我们先创建一个实例化对象

1
2
3
4
5
6
7
8
9
10
11
12
> tom <- Person$new(name = "tom", 1000)
> tom
<Person>
Public:
clone: function (deep = FALSE)
incSalary: function (percent)
initialize: function (name, money)
name: tom
say: function ()
Private:
money: 1000
setMoney: function (m)

然后调用对应的方法

1
2
3
4
5
6
7
8
9
10
> tom$name
[1] "tom"
> tom$money
NULL
> tom$incSalary(0.1)
change tom's salary!
> tom$setMoney
NULL
> tom$setMoney()
错误: 不适用于非函数

我们可以使用 $ 符号正常访问公有成员,但是无法访问私有成员

_注意_:我们在 incSalary 函数中添加了一行 invisible(self),这样我们就可以对这个方法进行链式调用了,例如

1
2
3
4
5
6
7
8
9
10
11
12
13
14
15
16
> tom$incSalary(0.1)$incSalary(0.2)$incSalary(0.3)
change tom's salary!
> tom
<Person>
Public:
clone: function (deep = FALSE)
incSalary: function (percent)
initialize: function (name, money)
name: tom
say: function ()
test: function ()
Private:
money: 1887.6
setMoney: function (m)

_注意_:我们在访问成员时都是使用了 selfprivate 对象,而不管是在 public 参数里面还是 private 参数里面

我们可以测试一下 selfprivate 到底是什么,我们在上面的例子中,添加一个 test 公有函数

1
2
3
4
5
6
7
8
9
10
11
12
13
14
15
16
17
18
19
20
21
22
23
24
25
26
27
28
29
30
Person <- R6Class(
"Person",
public = list(
name = NA,
initialize = function(name, money) {
self$name <- name
private$money <- money
},
say = function() {
cat("my name is ", self$name)
},
incSalary = function(percent) {
private$setMoney(private$money * (1 + percent))
},
test = function() {
print(self)
print(strrep("=", 20))
print(private)
print(strrep("=", 20))
print(ls(envir = private))
}
),
private = list(
money = NA,
setMoney = function(m) {
cat(paste0("change ", self$name, "'s salary!"))
private$money <- m
}
)
)

测试一下

1
2
3
4
5
6
7
8
9
10
11
12
13
14
15
16
17
> tom <- Person$new(name = "tom", 1000)
> tom$test()
<Person>
Public:
clone: function (deep = FALSE)
incSalary: function (percent)
initialize: function (name, money)
name: tom
say: function ()
test: function ()
Private:
money: 1000
setMoney: function (m)
[1] "===================="
<environment: 0x7fe1d2135cf0>
[1] "===================="
[1] "money" "setMoney"

从上面的输出结果可以看出,self 对象更像是实例化的对象本身,而 private 则是一个环境空间。这个环境空间就像是变量的作用域,因此,private 只在类中被调用,而对于类外部是不可见的。

4.4 主动绑定

主动绑定可以让对函数调用看起来像是在访问属性,主动绑定总是公开成员,外不可见的。

这与 Python 中的 @property 装饰器是一样的,有些时候,我们并不想直接把数据属性暴露在外面,被随意修改。

例如,我们有一个 Student 类,包含一个 score 属性,但是不想将其暴露在外面被随意修改,所以我们将其设置为私有属性,同时定义 get/set 方法,并在 set 方法中控制有效范围

1
2
3
4
5
6
7
8
9
10
11
12
13
14
15
16
17
18
19
20
Student <- R6Class(
"Student",
public = list(
name = NA,
initialize = function(name) {
self$name <- name
},
getScore = function() {
return(private$score)
},
setScore = function(score) {
if (score < 0 || score > 100)
stop("Score incorrect!")
private$score <- score
}
),
private = list(
score = NA
)
)

使用

1
2
3
4
5
6
> sam <- Student$new("sam")
> sam$setScore(99)
> sam$getScore()
[1] 99
> sam$setScore(101)
Error in sam$setScore(101) : Score incorrect!

这样是可以达到我们的目的,但还是不能像属性那样用起来方便

所以 R6 为我们提供了 active 参数,重新改写上面的例子

1
2
3
4
5
6
7
8
9
10
11
12
13
14
15
16
17
18
19
20
21
Student <- R6Class(
"Student",
public = list(
name = NA,
initialize = function(name) {
self$name <- name
}
),
private = list(
.score = NA
),
active = list(
score = function(s) {
if (missing(s))
return(private$.score)
if (s < 0 || s > 100)
stop("Score incorrect!")
private$.score <- s
}
)
)

_注意_:public, privateactive 参数内的属性名必须唯一,所以我们将私有属性改为了 .score

1
2
3
4
5
6
7
8
9
10
11
12
13
14
15
> sam <- Student$new("sam")
> sam
<Student>
Public:
clone: function (deep = FALSE)
initialize: function (name)
name: sam
score: active binding
Private:
.score: NA
> sam$score
[1] NA
> sam$score <- 100
> sam$score
[1] 100

4.5 继承

R6 通过 inherit 参数指定父类,例如,我们定义一个 worker 类,它继承自上面的 Person

1
2
3
4
5
6
7
8
9
10
Worker <- R6Class(
"Worker",
inherit = Person,
public = list(
company = "Gene",
info = function() {
print("NGS analysis!")
}
)
)

创建对象并使用父类的方法

1
2
3
4
5
6
7
8
9
10
11
12
13
14
15
16
17
18
> siri <- Worker$new("Siri", 100)
> siri$incSalary(0.1)
change Siri's salary!
> siri
<Worker>
Inherits from: <Person>
Public:
clone: function (deep = FALSE)
company: Gene
incSalary: function (percent)
info: function ()
initialize: function (name, money)
name: Siri
say: function ()
test: function ()
Private:
money: 110
setMoney: function (m)

我们可以使用 super 对象来调用父类的方法,让我们来重写 incSalary 方法

1
2
3
4
5
6
7
8
9
10
11
12
13
Worker <- R6Class(
"Worker",
inherit = Person,
public = list(
company = "Gene",
info = function() {
print("NGS analysis!")
},
incSalary = function(percent) {
super$incSalary(percent + 0.1)
}
)
)

运行与上面相同的代码

1
2
3
4
5
6
7
8
9
10
11
12
13
14
15
16
17
18
> siri <- Worker$new("Siri", 100)
> siri$incSalary(0.1)
change Siri's salary!
> siri
<Worker>
Inherits from: <Person>
Public:
clone: function (deep = FALSE)
company: Gene
incSalary: function (percent)
info: function ()
initialize: function (name, money)
name: Siri
say: function ()
test: function ()
Private:
money: 120
setMoney: function (m)

可以看到,工资的增长增加了 0.1

4.6 引用对象字段

如果您的 R6 类的属性中包含其他类的实例化对象时,该对象将在 R6 对象的所有实例中共享。例如

1
2
3
4
5
6
7
8
9
10
11
12
13
14
15
16
17
18
19
20
21
22
ShareClass <- R6Class(
"ShareClass",
public = list(
num = NULL
)
)

Common <- R6Class(
"Common",
public = list(
share = ShareClass$new()
)
)

> c1 <- Common$new()
> c1$share$num <- 1

> c2 <- Common$new()
> c2$share$num <- 2

> c1$share$num
[1] 2

_注意_:不能把实例化对象放在 initialize 方法中

1
2
3
4
5
6
7
8
9
10
11
12
13
14
15
16
17
UnCommon <- R6Class(
"Common",
public = list(
share = NULL,
initialize = function() {
share <<- ShareClass$new()
}
)
)

n1 <- UnCommon$new()
n1$share$num <- 1

n2 <- UnCommon$new()
n2$share$num <- 2

n1$share$num

可以看到,share 属性并没有改变

4.7 可移植和不可移植类

portable 参数可以设置 R6 类是否为可移植类型还是不可移植类型,主要区别在于:

  • 可移植类支持跨包继承,但是不可移植类型的兼容性不好
  • 可移植类使用 selfprivate 来访问成员。不可移植类直接使用属性名称来访问,如 share,并使用 <<- 操作符对这些成员进行赋值

4.8 为现有类添加成员

有时候,我们需要对已经创建的类添加新的成员,可以使用 $set() 方法来完成。

例如,我们为 Student 类添加一个属性

1
2
3
4
5
6
7
8
9
10
11
12
> Student$set("public", "age", 21)
> sam <- Student$new("sam")
> sam
<Student>
Public:
age: 21
clone: function (deep = FALSE)
initialize: function (name)
name: sam
score: active binding
Private:
.score: NA

当然也可以使用这种方式修改属性值

1
2
3
4
5
6
7
8
9
10
11
12
> Student$set("public", "age", 18, overwrite = TRUE)
> sam <- Student$new("sam")
> sam
<Student>
Public:
age: 18
clone: function (deep = FALSE)
initialize: function (name)
name: sam
score: active binding
Private:
.score: NA

_注意_:我们设置了 overwrite=TRUE

添加一个方法

1
2
3
4
> Student$set("public", "getName", function() self$name)
> sam <- Student$new("sam")
> sam$getName()
[1] "sam"

4.9 打印对象

R6 对象有一个默认的 print 方法,列出对象的所有成员。我们可以为类自定义一个 print 方法,那么它将覆盖默认的方法

1
2
3
4
5
6
7
8
9
10
11
12
13
14
15
16
17
18
19
20
21
22
23
24
25
26
27
28
29
30
Student <- R6Class(
"Student",
public = list(
name = NA,
initialize = function(name) {
self$name <- name
},
print = function(...) {
cat("class", class(self), "\n")
cat(ls(self), sep = ',')
}
),
private = list(
.score = NA
),
active = list(
score = function(s) {
if (missing(s))
return(private$.score)
if (s < 0 || s > 100)
stop("Score incorrect!")
private$.score <- s
}
)
)

> sam <- Student$new("sam")
> print(sam)
class Student R6
clone,initialize,name,print,score
  • END -